Search Results:
Hardened ubuntu nextdns security
posted on 09 Dec 2025 under category security
Post Meta-Data
| Date | Language | Author | Description |
|---|---|---|---|
| 09.12.2025 | English | Claus Prüfer (Chief Prüfer) | Hardened Ubuntu 25.10 with NextDNS: Enterprise-Grade Workstation Security |
Hardened Ubuntu / NextDNS Security

Modern operating systems and internet browsers have become increasingly bloated with telemetry, automated update mechanisms, and unencrypted communication channels that pose significant security risks. While Ubuntu provides an excellent foundation for Linux workstations, its default configuration prioritizes convenience over security—making it unsuitable for production environments without comprehensive hardening.
This article explores a complete hardening solution for Ubuntu 25.10 workstation systems, focusing on DNS-over-HTTPS (DoH) implementation, kernel hardening, and the removal of security-problematic default features. The solution strikes an optimal balance between usability and security, enabling production-ready deployment within minutes.
🛡️ Repository: The complete hardening solution is available at https://github.com/WEBcodeX1/hardened-ubuntu
The Security Problem: Unencrypted DNS Traffic
Transmitting DNS traffic unencrypted over the internet represents one of the most significant yet overlooked security vulnerabilities in modern computing. Every DNS query exposes:
- Browsing patterns and destinations - Revealing which websites, services, and resources you access
- Corporate infrastructure details - Internal naming schemes and organizational structure
- User behavior patterns - Time-based access patterns and service dependencies
- Attack surface information - Service discovery and infrastructure mapping for adversaries
DNS-Based Attack Vectors
Unencrypted DNS enables multiple attack scenarios:
DNS Poisoning/Spoofing:
- Attackers intercept DNS queries and inject malicious responses
- Users are redirected to phishing sites or malware distribution servers
- Man-in-the-middle attacks become trivial to execute
- Certificate validation can be bypassed through DNS manipulation
Traffic Analysis:
- Internet Service Providers (ISPs) log and monetize DNS queries
- State actors monitor DNS traffic for surveillance purposes
- Corporate networks analyze employee behavior through DNS logs
- Advertisers build detailed user profiles from DNS data
Combined Attack Scenarios: ⚠️ When automated updates are combined with DNS poisoning, the results can be catastrophic:
- Malicious package repositories can be injected
- System updates can be replaced with compromised versions
- Firmware updates can be intercepted and modified
- The entire security foundation becomes compromised
Ubuntu 25.10 Default Security Issues
Ubuntu 25.10, despite being a modern distribution, ships with several security-relevant features that provide insufficient administrative control:
| Feature | Risk Level | Description |
|---|---|---|
| Unattended Upgrades | 🔴 High | Fully automated updates without administrator approval |
| UEFI Firmware Updates | 🔴 High | Automated firmware modification without verification |
| HTTP Mirror URLs | 🔴 High | Package downloads over unencrypted HTTP connections |
| Ubuntu FAN Networking | ⚠️ Medium | VXLAN/UDP tunneling enabled by default |
| Telemetry Services | ⚠️ Medium | ubuntu-report, ubuntu-insights collecting system data |
| SNAP Package System | ⚠️ Medium | Proprietary package format with limited control |
| NetworkManager | ⚠️ Medium | Complex network management bypassing netplan |
Ubuntu 25.10 Improvements
Ubuntu 25.10 does introduce several positive security enhancements:
- ✅ XServer-less, 100% Wayland architecture - GNOME 49 eliminates X11 security vulnerabilities
- ✅ Enhanced systemd customization - Better service dependency management
- ✅ Improved YAML auto-installation - Automated secure deployments
- ✅ TPM 2.0+ hardware encryption - Experimental hardware-based disk encryption
However, these improvements don’t address the fundamental DNS security gap or the problematic default configurations.
The Hardened Ubuntu Solution
The hardening solution addresses these vulnerabilities through a systematic, multi-stage configuration process. The approach is designed for real-world enterprise environments where building from source (like Hardened Linux From Scratch) proves impractical due to maintenance overhead.
Core Security Features
The hardened configuration implements the following security enhancements:
🛡️ DNS Traffic Encryption:
- Complete DNS-over-HTTPS (DoH) implementation using dnscrypt-proxy
- All DNS queries encrypted, including shell/command-line traffic
- NextDNS integration for advanced filtering and threat protection
- Multicast DNS resolution completely disabled
🛡️ Kernel Hardening:
- Strict IOMMU hardening enabled
- Kernel debugging disabled
- Core dumps disabled system-wide
- Hardened sysctl parameters for network and memory protection
- Thunderbolt interface disabled
- IPv6 protocol stack disabled
🛡️ Module and Service Hardening:
- Unnecessary kernel modules blacklisted (Intel ME, etc.)
- USB attack protection via USBGuard
- Insecure D-Bus services disabled
- Telemetry services removed (ubuntu-report, ubuntu-insights)
- Avahi and Bluetooth services removed
- Ubuntu FAN networking disabled
🛡️ Package Management Security:
- HTTPS-only mirror URLs
- SNAP and snapd completely removed
- Firefox ESR from native Mozilla repository (non-SNAP version)
- Global hardened Firefox security configuration
- Automated unattended upgrades disabled
🛡️ Network Configuration:
- Netplan-based network management (replacing NetworkManager)
- Static network configuration for predictable behavior
- MTU optimization support (including jumbo frames)
- DHCP with NTP option support
Preserved Essential Components
The hardening solution maintains compatibility with standard enterprise requirements:
✅ systemd - Service management and dependency handling retained ✅ CUPS - Printing system preserved for office environments
💡 Note: For systemd-free environments, consider Devuan (https://www.devuan.org/) as an alternative.
NextDNS: Modern DNS Security Infrastructure
NextDNS provides a comprehensive DNS security solution designed with privacy and security as primary considerations. Unlike traditional DNS providers, NextDNS offers:
💡 Free Tier: NextDNS provides a generous free tier with 300,000 DNS queries per month, which is typically sufficient for individual users and small teams. This allows you to test and use the service without any cost. For higher volumes, paid plans are available.
💡 SDNS Stamps: Secure DNS stamps are encoded configuration strings containing server addresses, public keys, and other parameters needed to establish encrypted DNS connections. You can obtain your unique SDNS stamp from your NextDNS dashboard after creating an account.
Security Features:
- DNS-over-HTTPS (DoH) encryption for all queries
- Real-time threat intelligence and malware blocking
- Phishing protection and suspicious domain filtering
- DNSSEC validation for response integrity
Privacy Features:
- Zero logging options available
- Geographic server selection for minimal latency
- No sharing of DNS data with third parties
- Complete control over DNS query data retention
Advanced Filtering:
- Tracker and advertisement blocking
- Social media platform filtering
- Community-maintained security templates
- Custom blocklists and allowlists
- Parental controls and content filtering
Enterprise Features:
- Per-device configuration profiles
- Detailed analytics and logging (when enabled)
- API access for automated management
- Custom DNS rewrite rules
Setting Up Your NextDNS Account
Before proceeding with the Ubuntu hardening installation, you need to create and configure a NextDNS account:
Step 1: Create NextDNS Account
- Navigate to https://nextdns.io in your web browser
- Click on “Try it now” or “Sign up” to create a free account
- Register using your email address or social authentication
- Verify your email address if required
Step 2: Create Configuration Profile
- Once logged in, NextDNS automatically creates your first configuration
- You’ll receive a unique Configuration ID (e.g.,
abcdef) - This ID is required for the hardening installation scripts
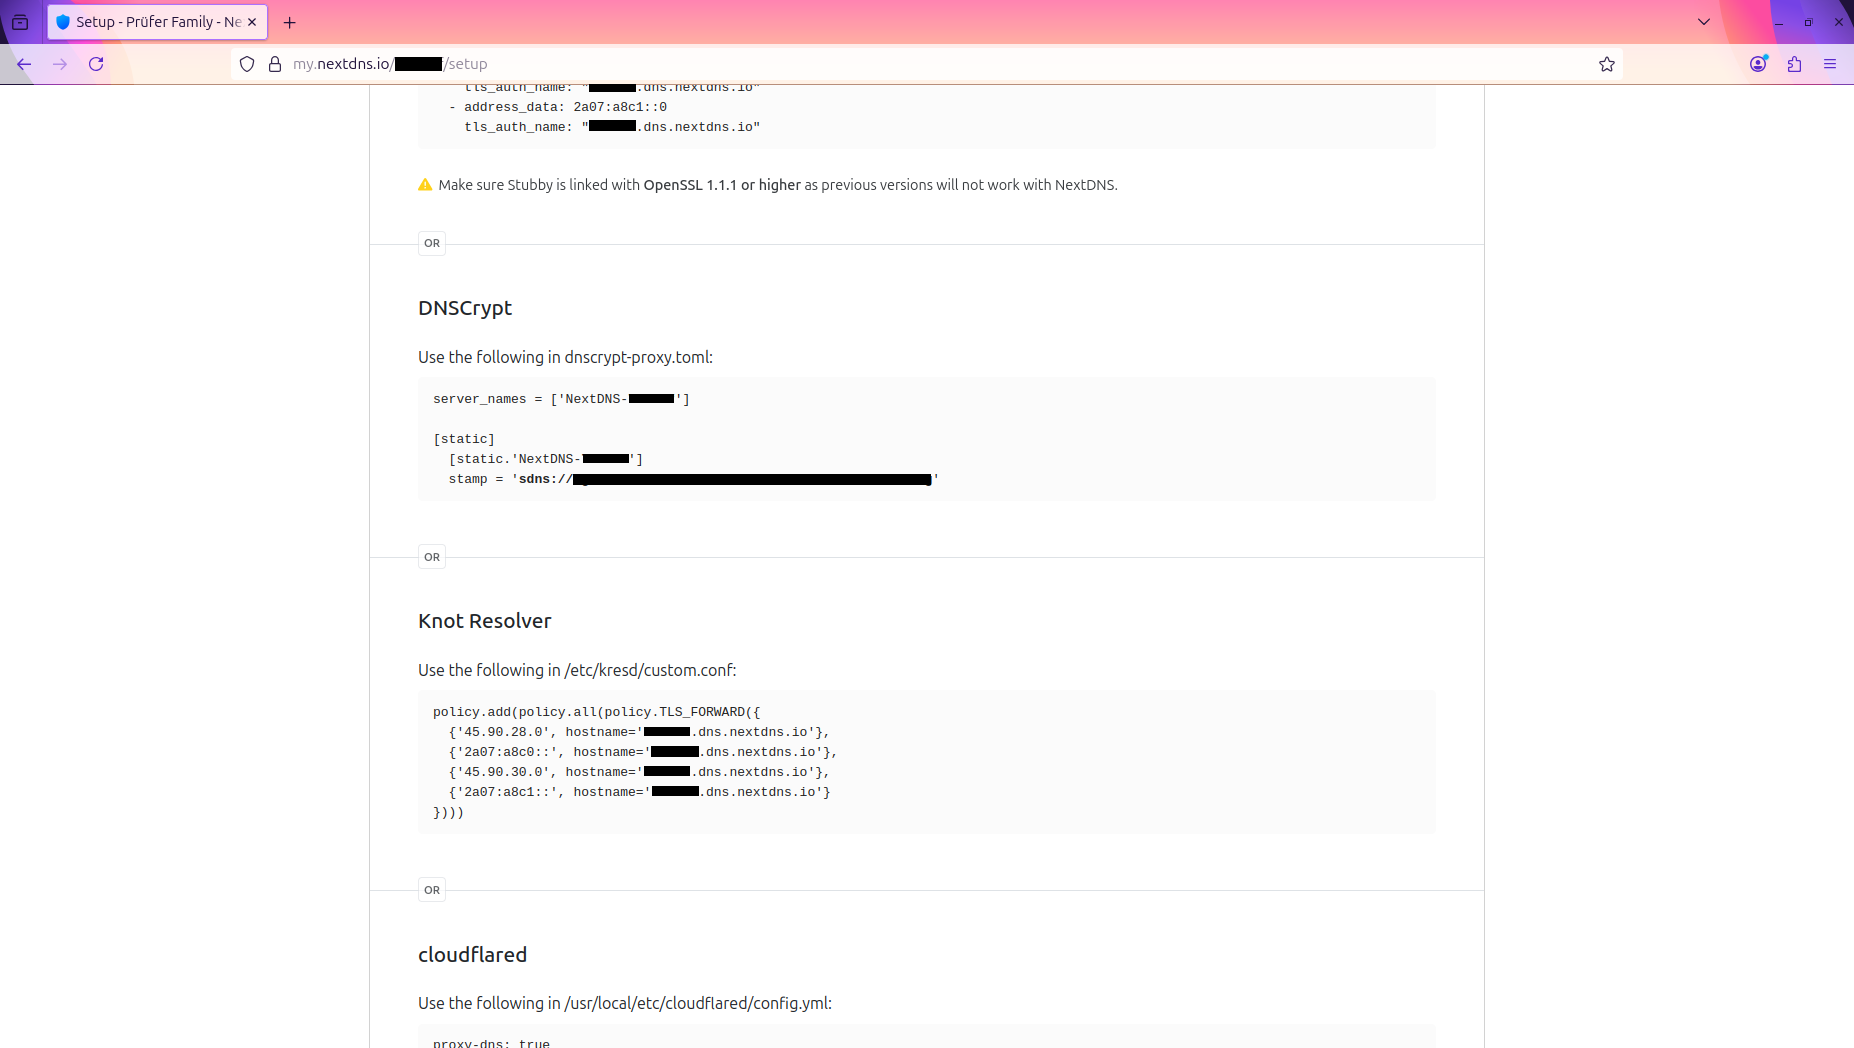
Step 3: Obtain SDNS Stamp
- In your NextDNS dashboard, navigate to the “Setup” tab
- Select “DNS-Over-HTTPS” or “DNS-Over-TLS” section
- Copy your unique SDNS stamp - this encoded string contains all necessary connection parameters
- The SDNS stamp format looks like:
sdns://AgEAAAAAAAAAAAANZG5zLm5leHRkbnMuaW8HL2FiY2RlZg
Step 4: Configure Security Settings
NextDNS offers extensive configuration options. Recommended initial settings:
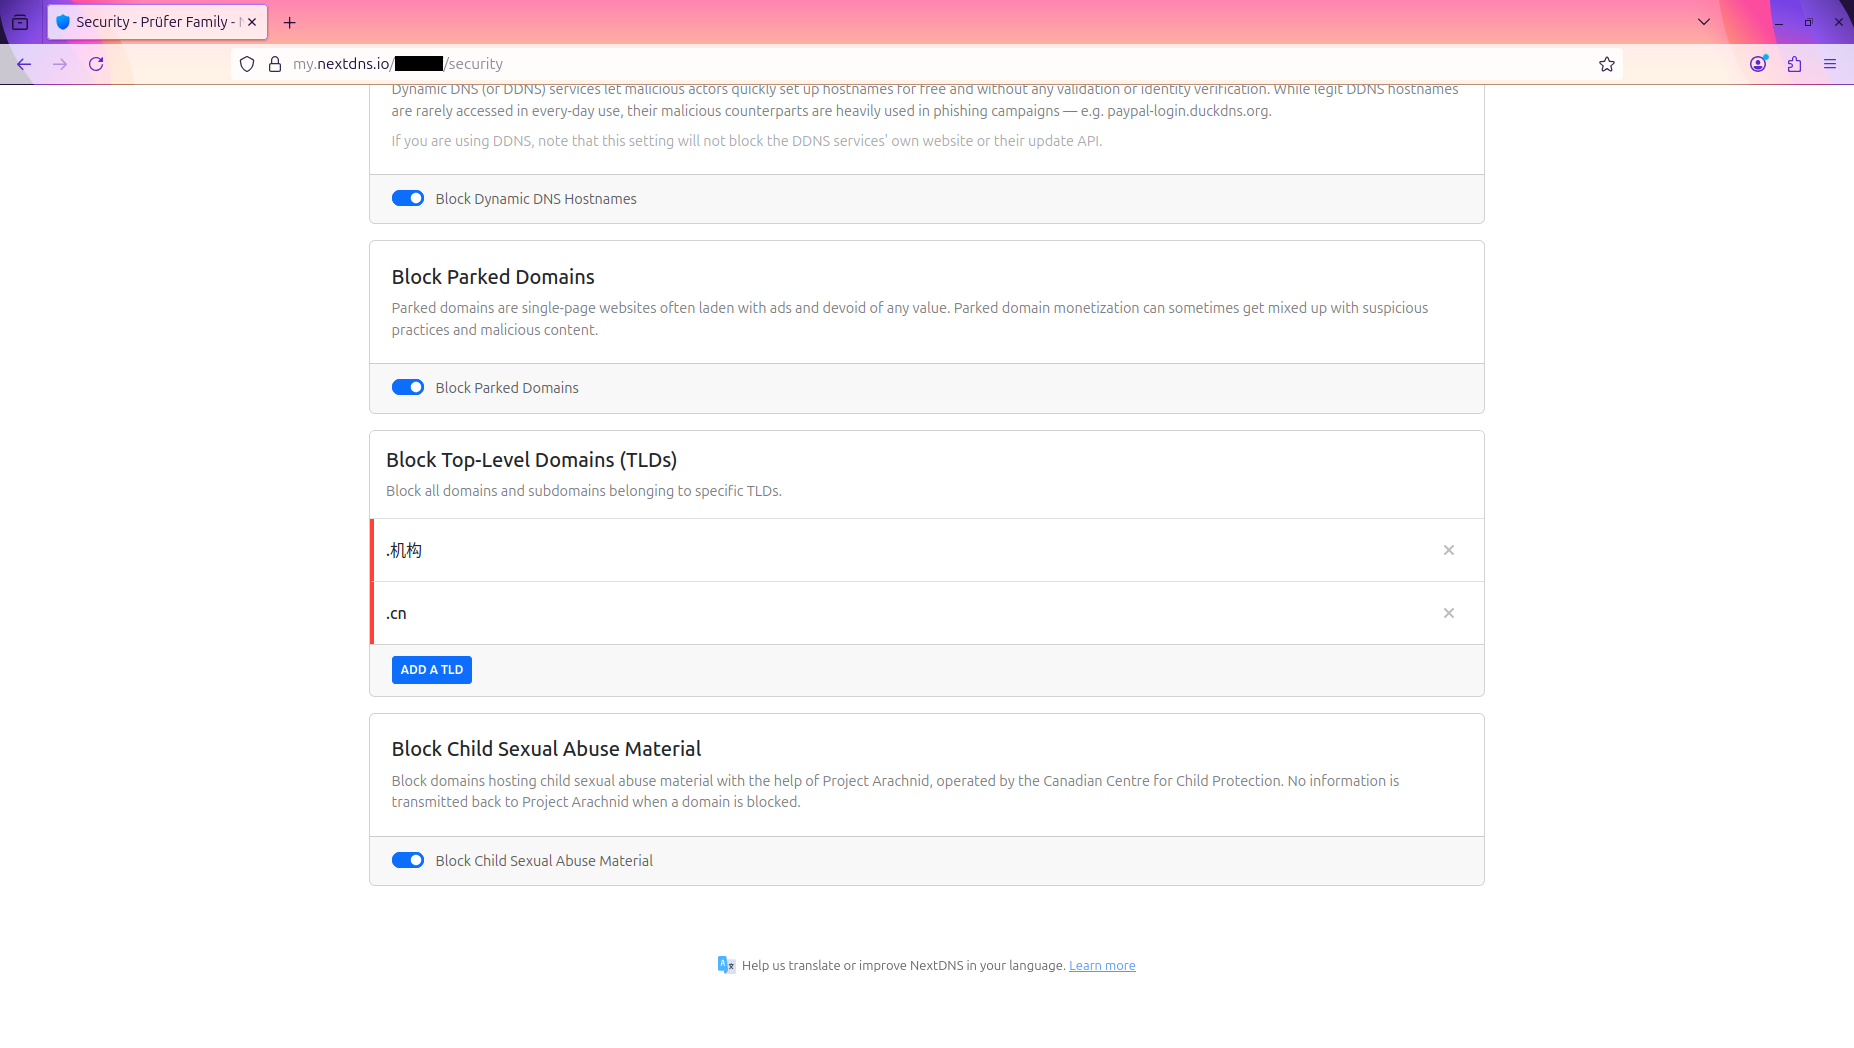
Security Settings:
- ✅ Enable Threat Intelligence Feeds - Blocks known malicious domains
- ✅ Enable AI-Driven Threat Detection - Machine learning-based threat identification
- ✅ Enable Google Safe Browsing - Protection against phishing and malware sites
- ✅ Enable Cryptojacking Protection - Blocks cryptocurrency mining scripts
- ✅ Enable DNS Rebinding Protection - Prevents DNS rebinding attacks
- ✅ Enable IDN Homograph Attacks Protection - Blocks lookalike domain names
- ✅ Enable Typosquatting Protection - Protects against common domain typos
- ⚠️ Consider enabling Newly Registered Domains blocking - May require allowlist adjustments
Step 5: Configure Privacy Settings
Privacy Options:
- Enable Block Ads & Trackers for comprehensive ad blocking
- Enable Block Disguised Third-Party Trackers (CNAME cloaking protection)
- Configure Logs Retention - Set to “No logs” for maximum privacy or enable for analytics
- Select geographic Server Location closest to your location for optimal performance
Step 6: Configure Allowlist and Denylist
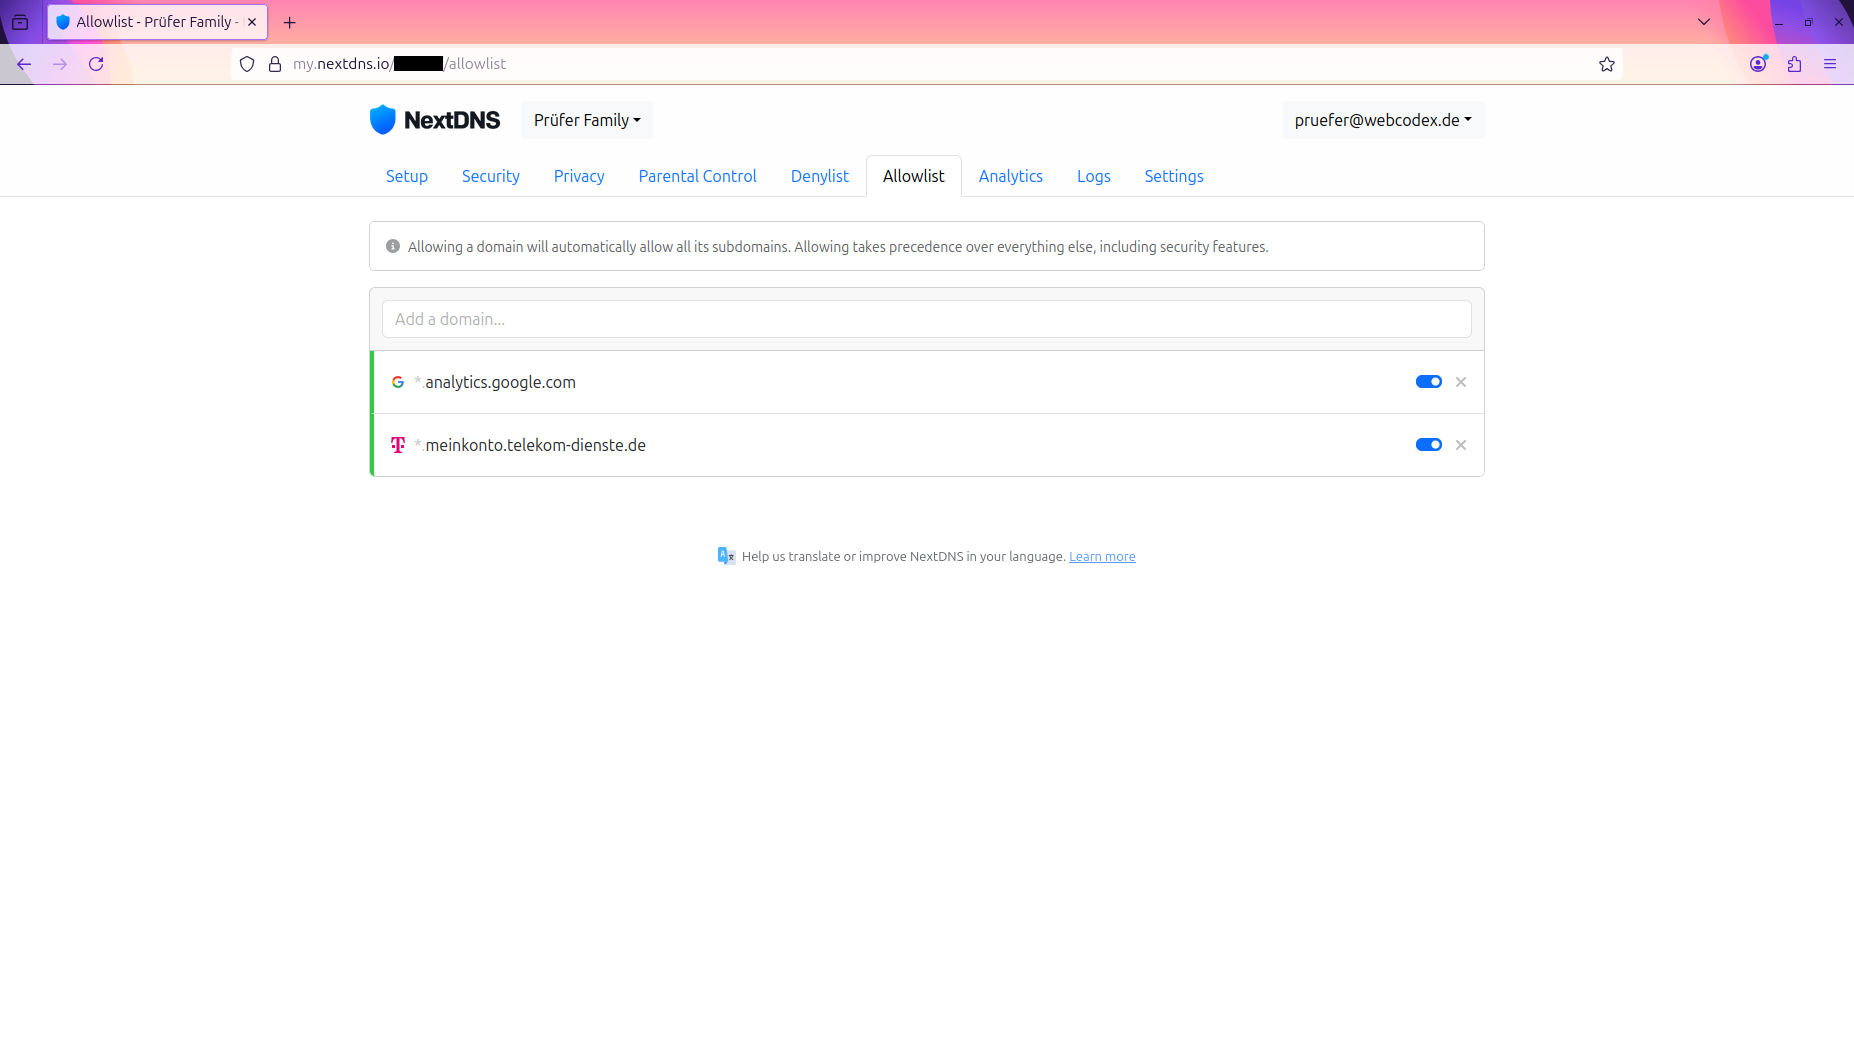
Allowlist Configuration:
- Add domains that should always be accessible even if blocked by security rules
- Useful for corporate domains, CDN services, or specific applications
- Format: Enter one domain per line (e.g.,
example.com,*.cdn.example.com)
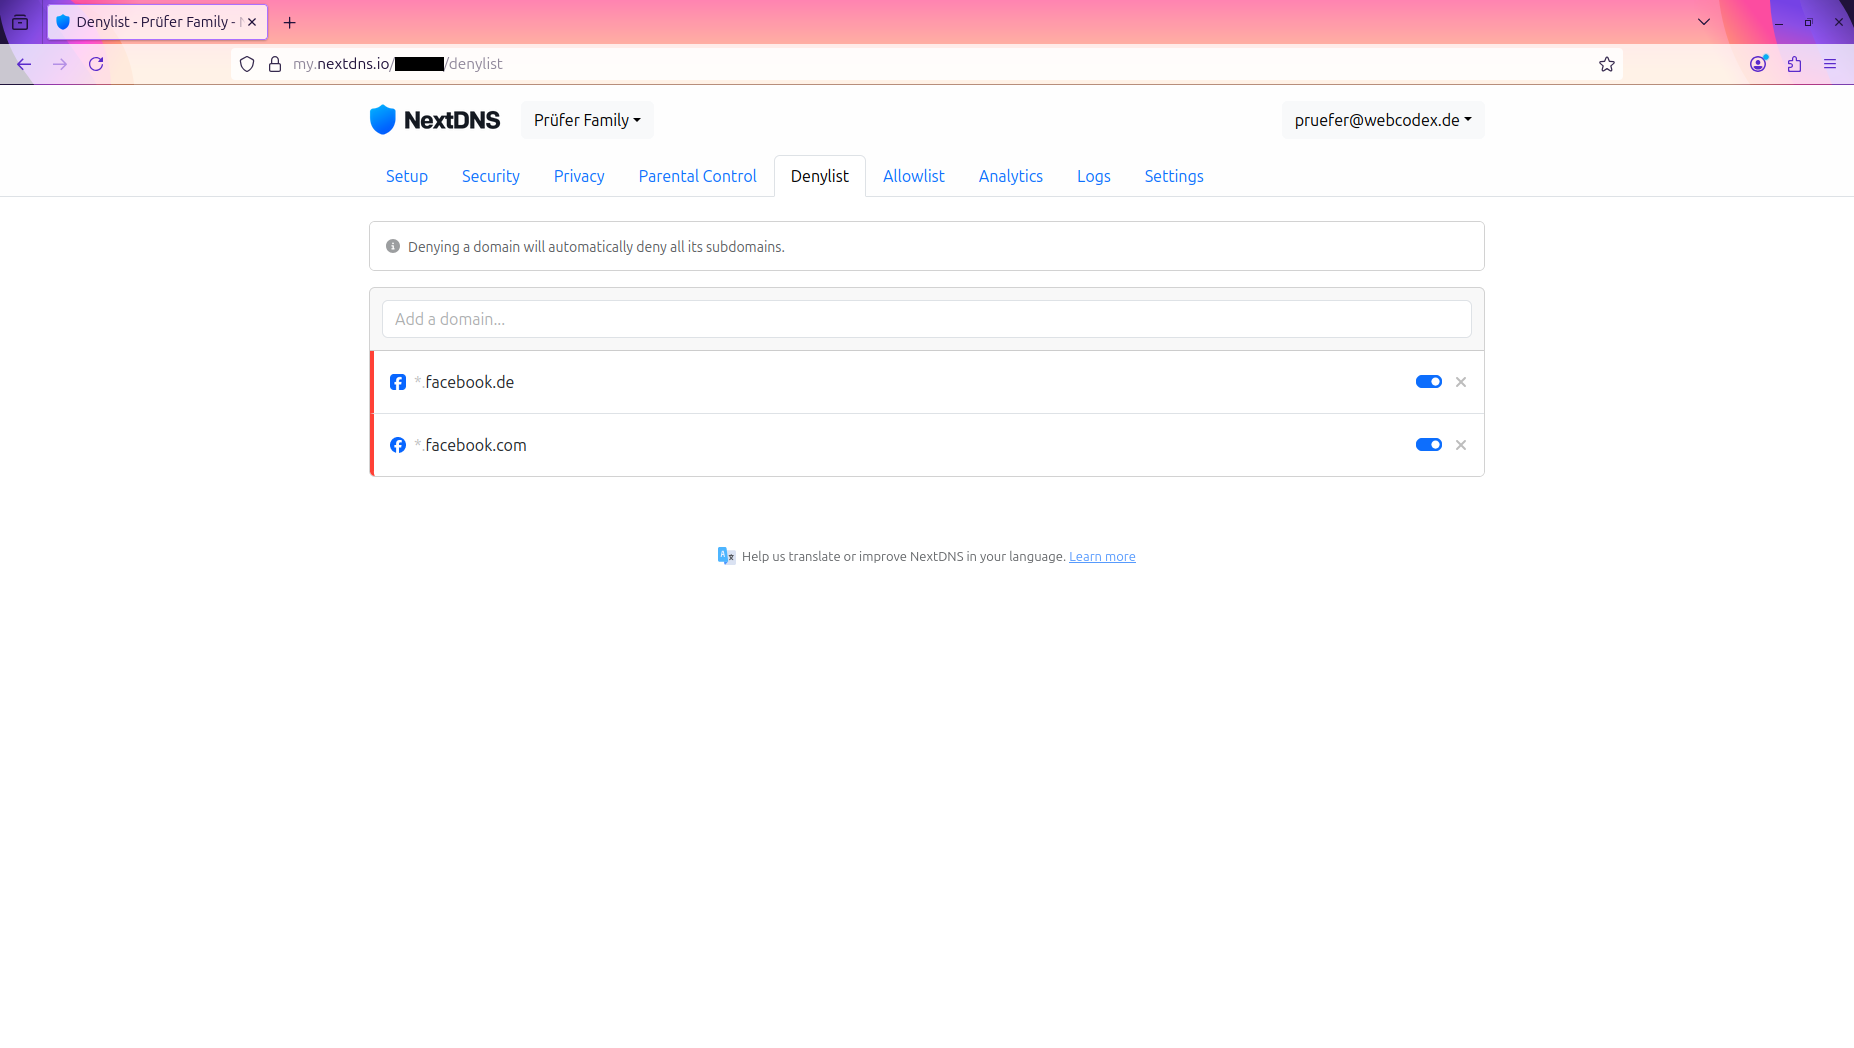
Denylist Configuration:
- Add domains that should always be blocked regardless of other settings
- Useful for known malicious domains, unwanted tracking services, or content filtering
- Supports wildcards for blocking entire subdomains
- Higher priority than other filtering rules
Step 7: Test Your Configuration
Before deploying to production systems:
- Use NextDNS’s built-in test page: https://test.nextdns.io
- Verify that your configuration is active and working correctly
- Test blocking by visiting a test malware domain (e.g.,
https://adblock.turtlecute.org) - Review the “Logs” section to see real-time DNS query resolution
💡 Pro Tip: Start with conservative security settings and gradually increase restrictions. Monitor your logs for false positives and adjust your allowlist accordingly.
DNS Security Infrastructure Requirements
To establish secure DNS infrastructure and prevent DNS-based attacks, the hardening solution implements:
- Route all DNS traffic to NextDNS DoH servers - No exceptions for any application
- Block unencrypted DNS queries - Both internal router and external DNS attempts
- Verify DoH endpoint addresses - Ensure encrypted traffic reaches correct destination
- Firewall unencrypted DNS ports - Block UDP/TCP port 53 for outbound traffic
DNS Infrastructure Comparison
The following diagrams illustrate the security difference between classical unencrypted DNS and modern encrypted DNS-over-HTTPS with NextDNS:
Classical DNS Setup (Unencrypted):
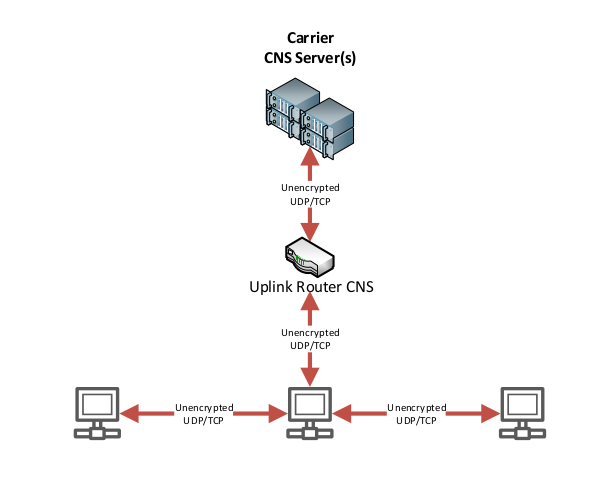
In the classical setup, all DNS queries are transmitted in plain text over UDP port 53, exposing:
- ❌ Domain names being accessed
- ❌ Browsing patterns and habits
- ❌ Corporate infrastructure details
- ❌ Vulnerability to DNS poisoning attacks
- ❌ Complete visibility to ISPs and network operators
- ❌ Internal and external network MIM attack surface
Encrypted NextDNS Setup (DNS-over-HTTPS):
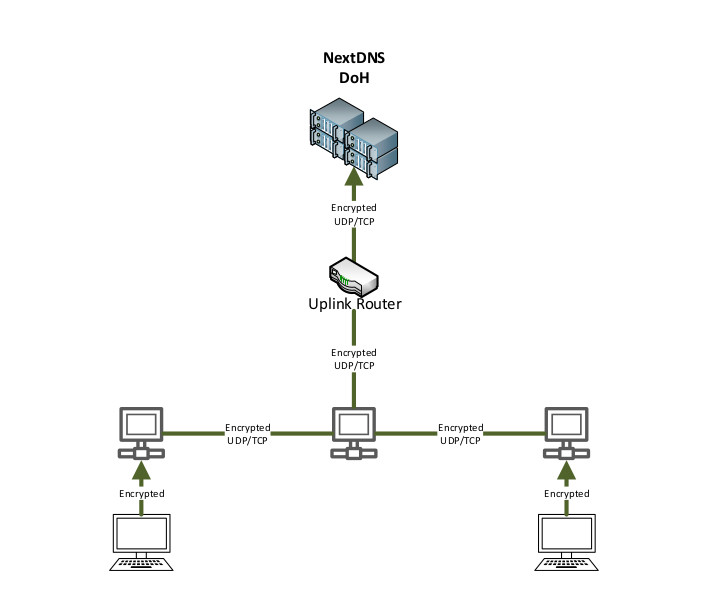
The hardened solution encrypts all DNS traffic using DNS-over-HTTPS (DoH):
- ✅ All DNS queries encrypted via HTTPS (port 443)
- ✅ Protection against DNS poisoning and spoofing
- ✅ Privacy from ISP monitoring and logging
- ✅ Threat intelligence and malware blocking
- ✅ Complete control over DNS filtering and logging
Installation Process Overview
The hardening solution consists of three sequential installer scripts that progressively harden the system:
Prerequisites
Before beginning the installation, ensure you have:
- Ubuntu 25.10 Desktop ISO image
- USB bootable installer (UNetbootin or Rufus)
- GPT-only mode enabled in Rufus for UEFI/Secure Boot
- Optional: EFI partition encryption (Ubuntu 25.10 supports TPM 2.0)
- Local DHCP configuration with NTP option (DHCP option 42)
- Active NextDNS account with SDNS stamp
Installation Stages
The installation follows a carefully designed sequence:
Stage 1: Initial Hardening (No Network)
- System configuration hardening
- Package removal (telemetry, avahi, bluez)
- Kernel parameter configuration
- Service disabling
- Requires system reboot
Stage 2: Security Components (Network Required)
- USBGuard installation
- dnscrypt-proxy installation and configuration
- DNS-over-HTTPS setup
- systemd-resolved reconfiguration
- Requires DNS verification
Stage 3: Final Configuration (Network Required)
- Package installations (development tools, applications)
- Firefox ESR installation (non-SNAP)
- Global Firefox hardening
- SNAP removal
- User-specific configurations
Step-by-Step Installation Guide
Step 1: System Configuration
IMPORTANT: Before running any installer scripts, configure system-specific parameters in config.sh.
# Clone the repository
git clone https://github.com/WEBcodeX1/hardened-ubuntu.git
cd hardened-ubuntu

# Edit configuration file
sudo vim config.sh
Configure the following critical parameters:
# network interface configuration
export NET_IF_NAME=enp2s0                  # NIC name
export NET_IF_MACADDRESS=12:34:56:78:9a:9b # interface MAC
export NET_IF_MTU=9000                     # MTU size

# NextDNS configuration
export NEXTDNS_ID="abcdef"                 # NextDNS configuration ID
export NEXTDNS_STAMP=""                    # SDNS stamp

# kernel configuration
export KERNEL_DOMAIN_NAME="domain.name"    # kernel domain name

# system users
export USER_IDS="ubuntu"                   # space-separated user IDs to process
Finding Network Interface Information:
# list network interfaces
ip link show

# display interface MAC address
ip link show <interface_name>
Step 2: Initial System Hardening
⚠️ Security Requirement: This script must be executed without network access to prevent potential security issues during configuration.
What installer-step1.sh does:
- ✅ Patches Ubuntu mirror URLs to use HTTPS
- ✅ Configures static NextDNS addresses in
/etc/hosts - ✅ Sets up netplan network configuration
- ✅ Removes unwanted packages (avahi, bluez, telemetry)
- ✅ Disables insecure system and D-Bus services
- ✅ Blacklists unnecessary kernel modules
- ✅ Configures system limits and sysctl parameters
- ✅ Sets kernel command line parameters in GRUB
Execute the script:
cd hardened-ubuntu

# verify config.sh is properly configured
cat config.sh

# run first installer script as root
sudo ./installer-step1.sh
After completion, reboot the system:
sudo reboot
Step 3: Security Components Installation
After rebooting, execute the second installer script. This script requires network access and installs base security requirements.
What installer-step2.sh does:
- ✅ Updates and upgrades system packages
- ✅ Installs USBGuard for USB attack protection
- ✅ Installs dnscrypt-proxy for DNS-over-HTTPS
- ✅ Installs libnss-resolve for command-line DNS resolution
- ✅ Configures systemd-resolved to use local dnscrypt-proxy
- ✅ Configures dnscrypt-proxy with NextDNS settings
- ✅ Disables and masks dnscrypt-proxy-resolvconf service
Execute the script:
cd hardened-ubuntu
sudo ./installer-step2.sh
Step 4: Verify DNS-over-HTTPS Configuration
⚠️ Critical Step: After installer-step2.sh completes, you must verify that DNS encryption is working correctly before proceeding.
Check dnscrypt-proxy service status:
systemctl status dnscrypt-proxy
Expected output: Service should be active (running) with no errors.
Verify DNS resolution is working:
# test DNS resolution
dig github.com

# verify DNS queries are going through dnscrypt-proxy
sudo journalctl -u dnscrypt-proxy -n 50
Troubleshooting DNS Issues:
If the dnscrypt-proxy service shows errors:
# check detailed logs
sudo journalctl -u dnscrypt-proxy -xe

# verify dnscrypt-proxy configuration
sudo cat /etc/dnscrypt-proxy/dnscrypt-proxy.toml | grep -A 5 "server_names"

# test connectivity to NextDNS servers
ping -c 4 dns.nextdns.io
❌ Do not proceed to Step 4 if DNS is not functioning correctly.
Step 4: Final Package Installation and Configuration
The final installer script installs additional packages and applies user-based security settings.
What installer-step3.sh does:
- ✅ Updates and upgrades all system packages
- ✅ Installs essential packages (aptitude, intel-microcode, vim, kate, xterm, foot)
- ✅ Installs development tools (docker.io, build-essential, debhelper, pbuilder, devscripts)
- ✅ Installs applications (GIMP, OpenSC, VLC)
- ✅ Installs Firefox ESR from Mozilla repository (non-SNAP version)
- ✅ Applies global hardened Firefox configuration
- ✅ Removes SNAP desktop applications and icons
- ✅ Enables custom systemd security service
- ✅ Disables ubuntu-fan network service
Execute the script:
cd hardened-ubuntu
sudo ./installer-step3.sh
Post-Installation Security Verification
After completing all installation steps, verify the hardening configuration:
Verify Kernel Hardening
# check sysctl security parameters
sudo sysctl -a | grep -E "(kernel\.|net\.)"

# verify blacklisted kernel modules
lsmod | grep -E "(mei|bluetooth|btusb)"

# check kernel command line parameters
cat /proc/cmdline
Verify Service Status
# verify disabled services
systemctl list-unit-files | grep -E "(avahi|bluetooth|telemetry|snap)"

# verify USBGuard is active
systemctl status usbguard
Verify Network Time
# check chrony client runtime config
chronyc

# list active sources
chronyc> sources
Automated USB Installation
For enterprise deployments, the repository includes autoinstall configuration for fully automated installations.
Autoinstall Configuration
The /autoinstall/autoinstall.yaml template can be customized and integrated into Ubuntu 25.10 installation ISO:
autoinstall:
  version: 1
  timezone: "Europe/Berlin"
  locale: "en_US.UTF-8"
  keyboard:
    layout: de
    variant: ""
    toggle: null
  identity:
    realname: 'User Name'
    username: userid
    password: '$y$j9T$HASH...'  # Replace with hash generated by: mkpasswd -m yescrypt
    hostname: ubuntu
  storage:
    layout:
      name: direct
  kernel-crash-dumps:
    enabled: false
  shutdown: poweroff
Creating Bootable USB Auto-Installation Medium
Generate encrypted password:
# install password generation tool
sudo apt-get install whois

# generate encrypted password for autoinstall
mkpasswd -m yescrypt
Create custom ISO with hardening scripts:
# extract Ubuntu ISO
mkdir -p /tmp/ubuntu-iso /tmp/ubuntu-custom
sudo mount -o loop ubuntu-25.10-desktop-amd64.iso /tmp/ubuntu-iso
cp -rT /tmp/ubuntu-iso /tmp/ubuntu-custom

# add autoinstall configuration
mkdir -p /tmp/ubuntu-custom/autoinstall
cp autoinstall/autoinstall.yaml /tmp/ubuntu-custom/

# copy hardening scripts to ISO
mkdir -p /tmp/ubuntu-custom/hardening
cp *.sh *.conf *.toml *.yaml *.js /tmp/ubuntu-custom/hardening/

# install xorriso
sudo apt-get install xorriso

# create custom (hybrid) ISO
cd /tmp/ubuntu-custom
sudo xorriso \
  -as mkisofs \
  -V "Ubuntu 25.10 Hardened" \
  --modification-date="$(shell date -u +"%Y%m%d%H%M%S00")" \
  --grub2-mbr --interval:local_fs:0s-15s:zero_mbrpt,zero_gpt:'ubuntu-25.10-desktop-amd64.iso' \
  --protective-msdos-label \
  -partition_cyl_align off \
  -partition_offset 16 \
  --mbr-force-bootable \
  -append_partition 2 28732ac11ff8d211ba4b00a0c93ec93b --interval:local_fs:11126816d-11137071d::'ubuntu-25.10-desktop-amd64.iso' \
  -appended_part_as_gpt \
  -iso_mbr_part_type a2a0d0ebe5b9334487c068b6b72699c7 \
  -c '/boot.catalog' \
  -b '/boot/grub/i386-pc/eltorito.img' \
  -no-emul-boot \
  -boot-load-size 4 \
  -boot-info-table \
  --grub2-boot-info \
  -eltorito-alt-boot \
  -e '--interval:appended_partition_2_start_2781704s_size_10256d:all::' \
  -no-emul-boot \
  -boot-load-size 10256 \
  -o /tmp/ubuntu-25.10-hardened.iso \
  .
Write ISO to USB (Linux):
# find USB device
lsblk

# write ISO to USB (REPLACE sdX with your actual USB device like sdb or sdc)
# WARNING: This will erase all data on the target device!
sudo dd if=/tmp/ubuntu-25.10-hardened.iso of=/dev/sdX bs=4M status=progress oflag=sync
Conclusion
The hardened Ubuntu 25.10 solution addresses critical security vulnerabilities present in default Ubuntu installations. By implementing DNS-over-HTTPS, removing telemetry and unnecessary services, hardening kernel parameters, and providing USB attack protection, this solution creates a production-ready, security-focused workstation environment.
The installation process, while requiring multiple stages and verification steps, ensures that each security component is properly configured and functioning before proceeding. This methodical approach prevents common pitfalls associated with security hardening, such as broken DNS resolution or network connectivity issues.
🛡️ Repository Access: The complete hardening solution, including all configuration scripts, templates, and documentation, is available at https://github.com/WEBcodeX1/hardened-ubuntu
For organizations and individuals requiring secure, privacy-focused Linux workstations, this solution provides an excellent balance between security hardening and usability. The combination of NextDNS for encrypted DNS traffic, comprehensive kernel hardening, and careful service management creates a robust security foundation suitable for enterprise deployment.
Key Takeaways
- DNS encryption is fundamental - Unencrypted DNS traffic represents a critical security vulnerability
- Default configurations prioritize convenience - Enterprise security requires explicit hardening
- Automated updates pose risks - Manual update management provides necessary control
- Layered security approach - Multiple complementary security measures create defense in depth
- Verification is essential - Each installation stage must be verified before proceeding
The future of workstation security lies in solutions that combine strong cryptographic protections (DNS-over-HTTPS), minimalist software configurations (service reduction), and defense-in-depth strategies (kernel hardening, USB protection). This hardened Ubuntu solution demonstrates that enterprise-grade security can be achieved on commodity Linux distributions with proper configuration and management.